New accounts automatically get a free 15-minute trial – no credit card needed. One trial per computer.
On your account page you'll find your license key (looks like TL-XXXX-XXXX-XXXX-XXXX). While you're signed in it is filled in automatically in the web app – in the desktop program you paste it.
When you're ready to continue after the trial, pick a plan on the same page. Every plan has every feature – only the hours differ.
2. Open the web app
Open tolkalive.se/app in Chrome or Edge on the computer that receives the audio.
Signed in to your account? Then the license key is filled in automatically – otherwise paste it.
Allow microphone access when the browser asks – without it Tolka hears nothing.
Done – nothing to install. Continue with step 3.
Prefer the desktop program? Installing on Mac (Apple Silicon) and Windows
Double-click the downloaded .dmg file. A window opens — drag Tolka Live onto the Applications folder (the shortcut is shown in the window).
Open the app from Launchpad or Applications. It is signed and notarized by Apple, so it opens right away with no warnings.
Grant microphone access when asked – without it the app hears nothing.
Older Intel Mac? Use the web app above.
Windows 10 / 11
Download the Windows installer (TolkaLive-windows-x64-setup.exe) and double-click it.
Follow the setup wizard — the app is installed and a Start-menu shortcut is created (and a desktop icon if you like).
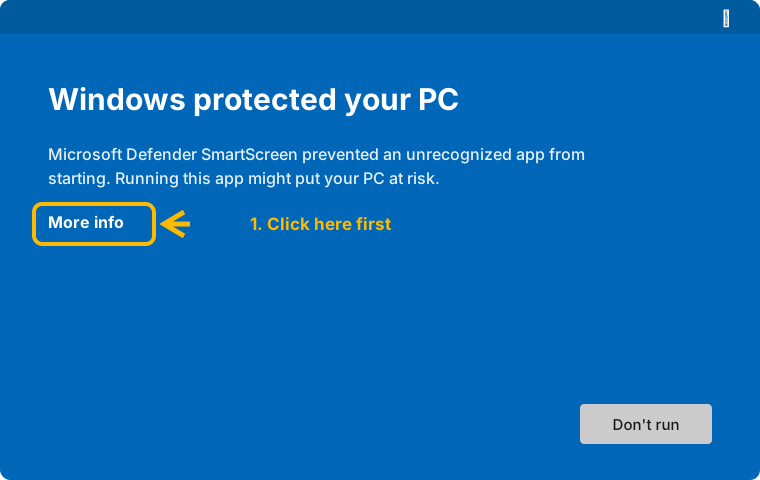
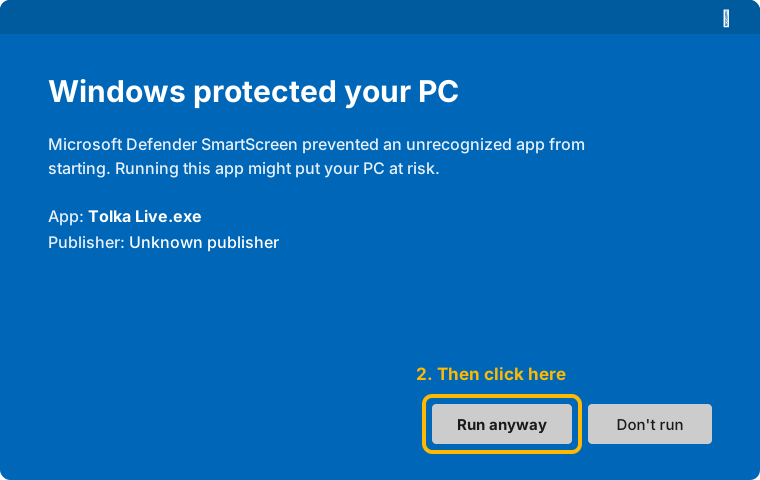
If Windows shows "Windows protected your PC": click More info → Run anyway.
The warning appears because the Windows build doesn't have a signing certificate yet — the app is safe,
and the dialog only shows once. It looks like this:
Step 1: Click the underlined More info link.Step 2: Click Run anyway. Done — the dialog won't come back.
3. First start
Pick Translate to – the language the captions should appear in. Add more with + Add language.
Pick the microphone (see the next section). The level meter should move when someone speaks.
Press Start. Speak – the text appears in the Live captions box within a second. Click the text for fullscreen.
Your usage is shown in the web app and on your account page. Tolka warns at
80 % of the month's hours and stops at 100 %.
In the desktop program
The app opens ⚙ Settings automatically on first run.
Sign in with your account: email + password and Sign in, or Sign in with Google (opens the browser) — the license key fills in automatically. You can also paste the license key manually.
Pick Translate from (or leave Auto-detect) and Translate to – the language the captions should appear in.
Pick your microphone/input (see next section).
Press Start Translation. Speak – text should appear in the window within a second or two.
Good to know: F1 settings · F2 transparent overlay · F11 fullscreen · ESC quit.
The ✕ Clear button instantly blanks the captions everywhere (window, projector, stream).
4. Audio & microphone
Best results come from a feed off your mixer/audio interface (e.g. Focusrite Scarlett) – the app auto-selects Scarlett/Focusrite if found.
The computer's built-in microphone works for testing but picks up room noise.
Send a mono mix of the speech microphone (no music) to the app's input – music and crowd noise degrade the translation.
5. Fastest path: Screen mode (no ProPresenter)
Just a projector or TV connected as a second display? Then you don't need ProPresenter:
In the web app: click the text in Live captions for fullscreen. In the desktop program: press 🖥 Screen – captions open fullscreen on the display your control window is not on.
In the desktop program: press again to move to the next display; after the last one it closes. ESC closes too.
Text size adapts automatically; in the desktop program ✕ Clear blanks the screen instantly.
Perfect for quick setups — plug in the projector as a second display, press Start and click the text (or 🖥 in the desktop program). Done.
6. ProPresenter – captions on projector & stage display
There are two ways to show captions on the audience screen. Method 1 (recommended) shows the text
as a web overlay inside a Prop — the operator can hide the Prop at any time and it stays hidden,
and the captions persist across slide changes. Method 2 (Messages) suits teams who prefer styling the
text with ProPresenter's Message themes. The stage display (speaker's screen) works the same with both — see below.
Method 1 — Prop with a web overlay (recommended)
The web app publishes the captions automatically – in the desktop program, check
Publish captions online under ⚙ Settings and press Start Translation.
In ProPresenter: open the Props panel and click + to create a new Prop.
Name it e.g. Translation.
Edit the Prop and insert a web object (the globe icon).
URL: your personal Caption link from the portal
(tolkalive.se/overlay/?id=…) — it works regardless of network, even for
a remote stream team.
Important: stretch the web object to cover the full slide.
The caption positions itself bottom-center automatically — a smaller box only shows the empty top of the page.
Test: append ?text=Hello to the URL to show sample text right away.
Remove it again before going live.
Show the Prop when you want captions. Hide it (or Clear All) and it stays hidden
until you show it again — Tolka never forces it back on.
Appearance is controlled with URL parameters: ?size=5 (text size, vh) ·
?color=ffffff (text colour) · ?bg=000000 or ?bg=none (the backdrop behind the text) ·
?bgopacity=0.45 (backdrop opacity) · ?bottom=6 (distance from the bottom edge, vh).
Example: …/overlay/?id=…&size=4&bg=none. Preview it in any web browser.
Fully local instead? The desktop app can also serve the overlay on your own network
without the cloud: check Caption web overlay (port 8899) and use http://localhost:8899/
(or the Tolka computer's IP) as the URL — requires both computers on the same network. The same styling parameters apply.
Method 2 — audience Message (alternative)
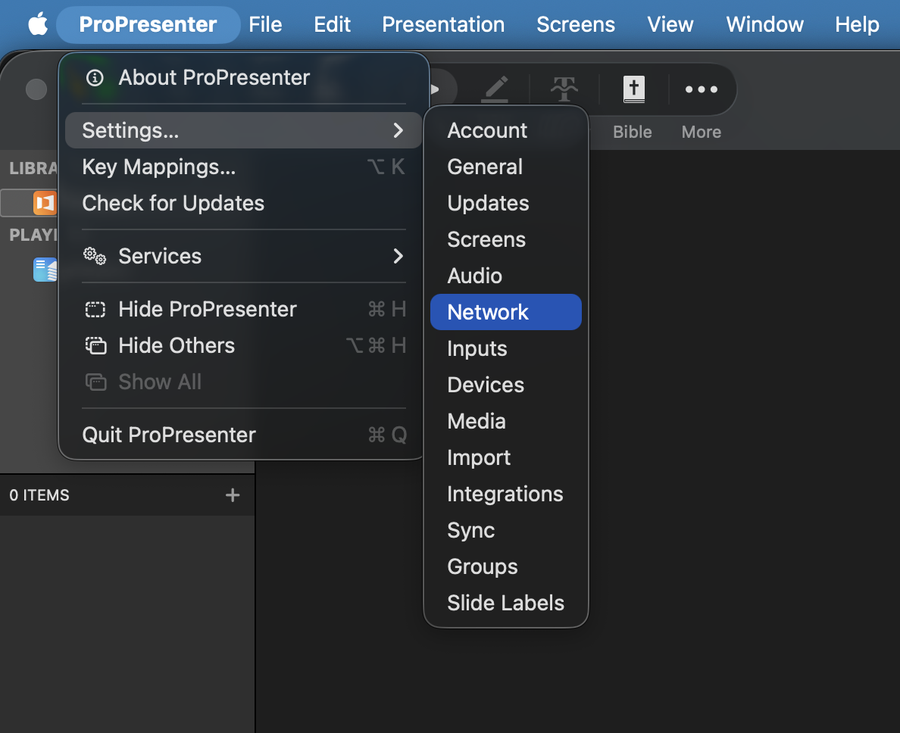
Open ProPresenter's settings: ProPresenter → Settings… and choose the Network tab.
ProPresenter → Settings… → Network.
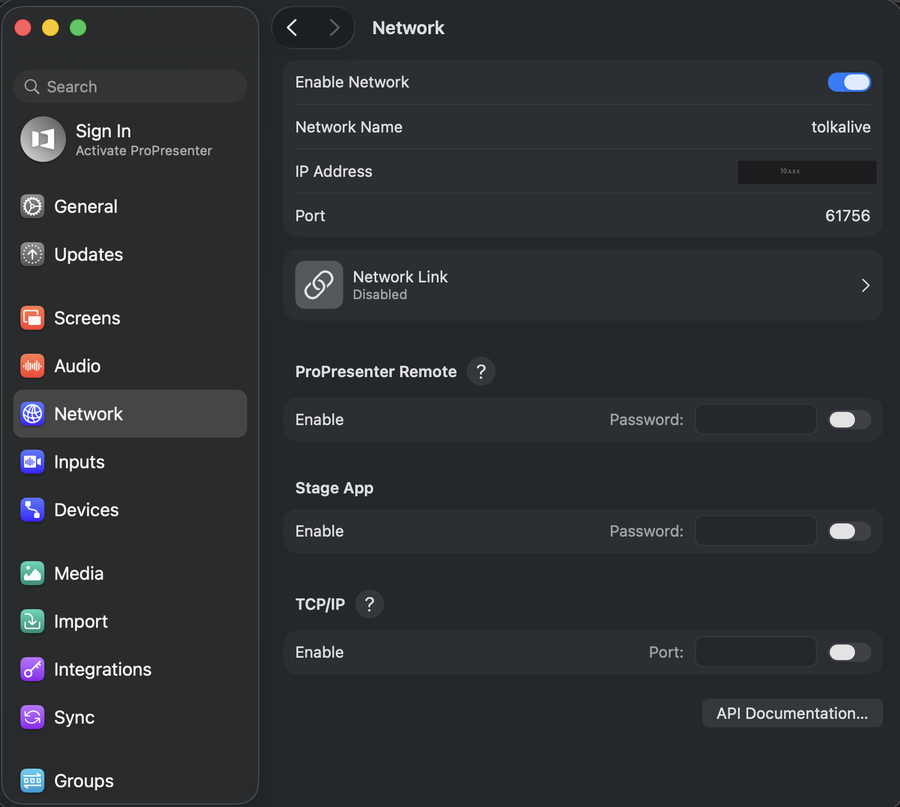
Turn on Enable Network. Note the Port number — that's the port you'll enter in Tolka Live.
Important: copy the exact port shown here. ProPresenter picks its own port number and it differs
between installations.
Enable Network on — copy the Port number shown. Your IP is shown too, if ProPresenter runs on another computer.
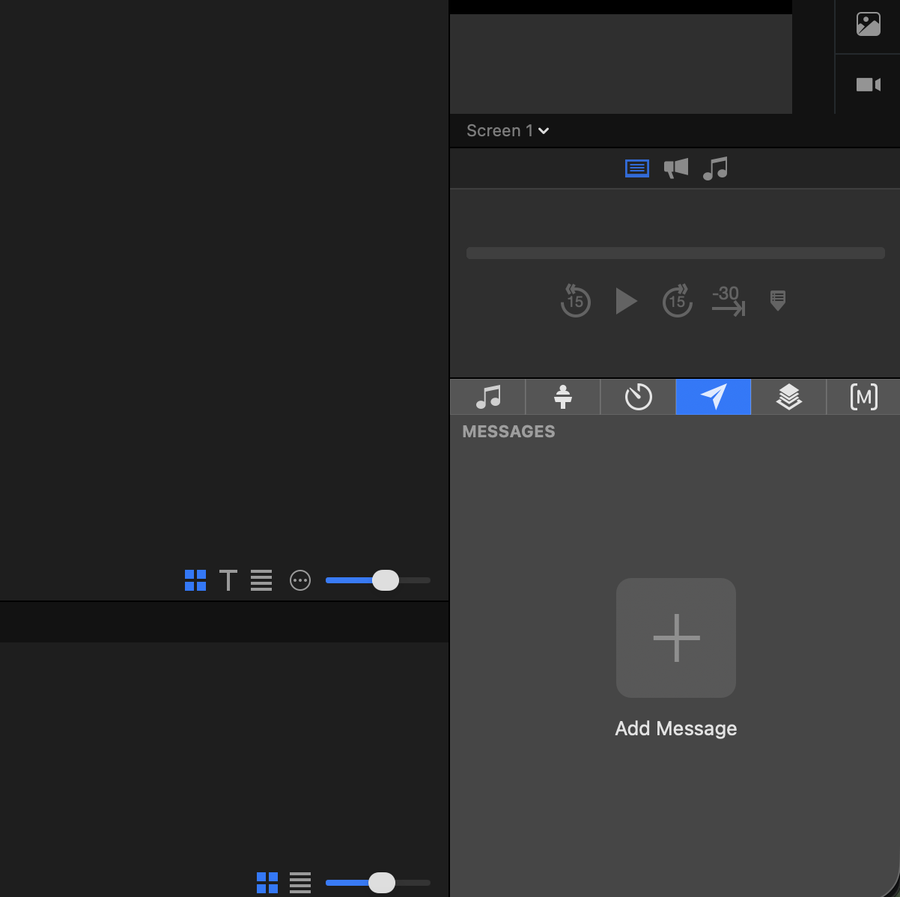
Create the message: open the Messages panel (paper-plane icon) and click + Add Message.
Messages panel → + Add Message.
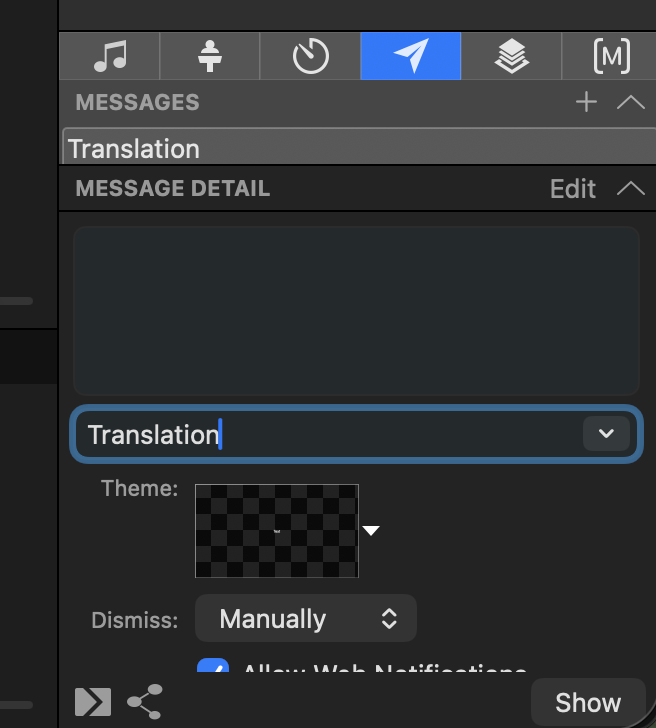
Name it exactly Translation. Under Message Detail: type Translation in the
token box and press Enter to create the token. (Type Translation, not "text".)
Type Translation in the token box and press Enter.
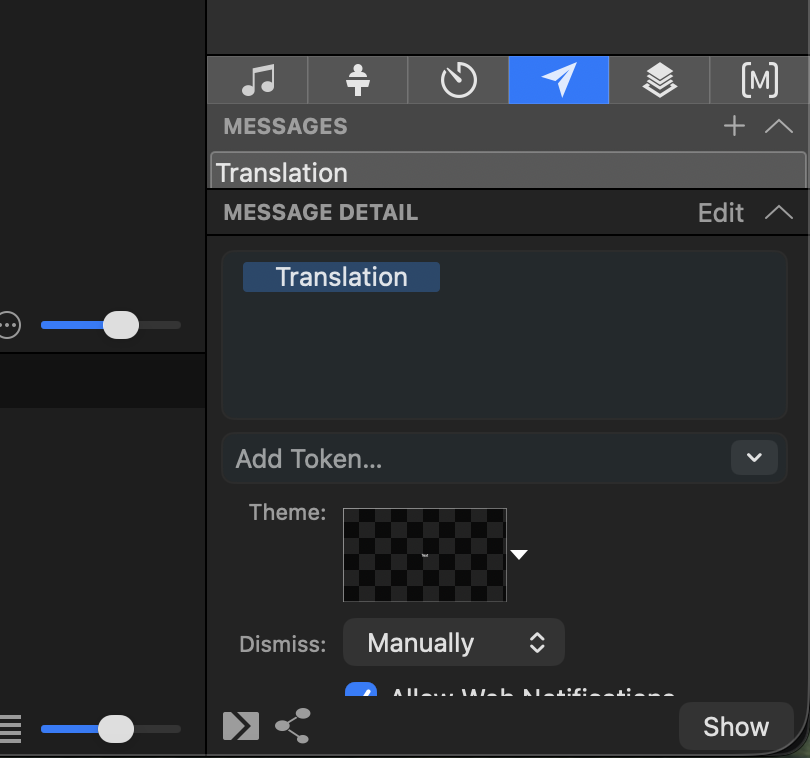
The Translation token now appears as a blue chip in the message — that's all the content it needs.
Style it via Theme so the captions look the way you want.
The Translation token is added. The message is ready.
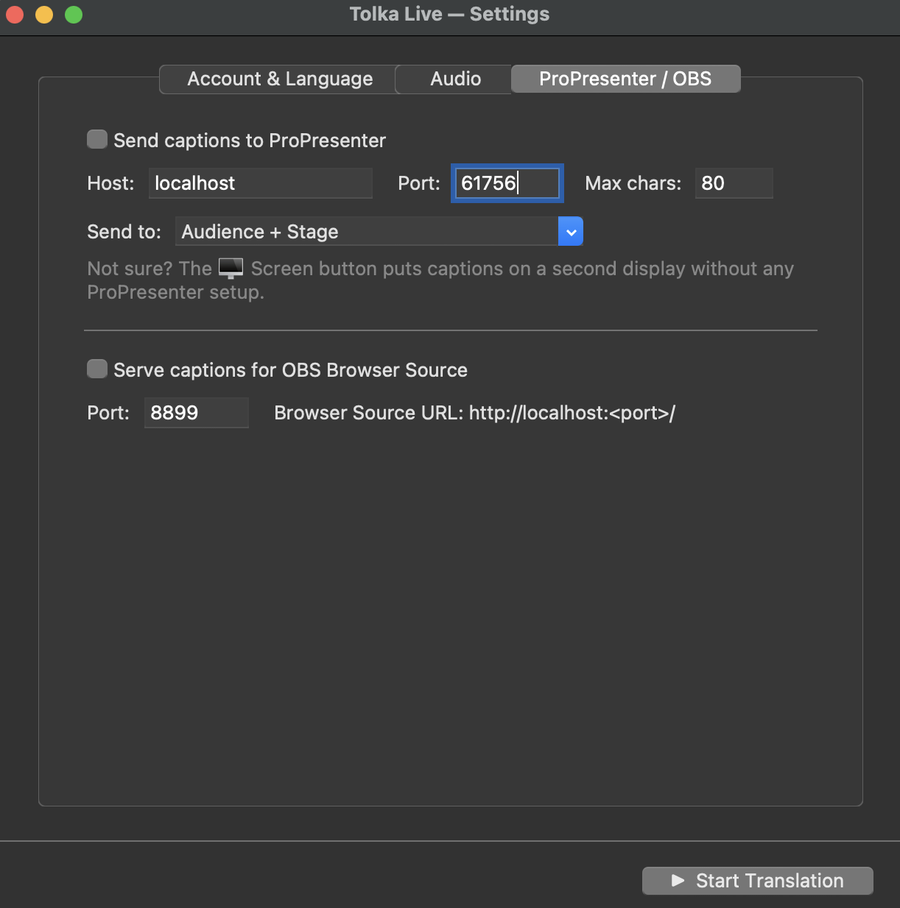
In the desktop program: ⚙ Settings → ProPresenter / OBS tab → check Send captions to ProPresenter.
Host: localhost if ProPresenter runs on the same computer, otherwise the other computer's IP.
Port: the number from step 2. Choose Send to and adjust Max chars to fit your rows.
Enter the same port ProPresenter shows. Done — press Start Translation.
Tip: already pressed Start? After you create or change the message in ProPresenter you may need to
restart Tolka Live (⏹ Stop then ▶ Start) so the app picks up the new message.
Note: every new caption shows the Message again — if the operator clears it in ProPresenter,
it comes back with the next sentence. Pause with ✕ Clear in Tolka Live instead. (This is why we
recommend Method 1, where hidden stays hidden.)
Stage display (speaker's screen — works with both methods)
The stage display uses the network API: do steps 1–2 of Method 2 (Enable Network, note the port).
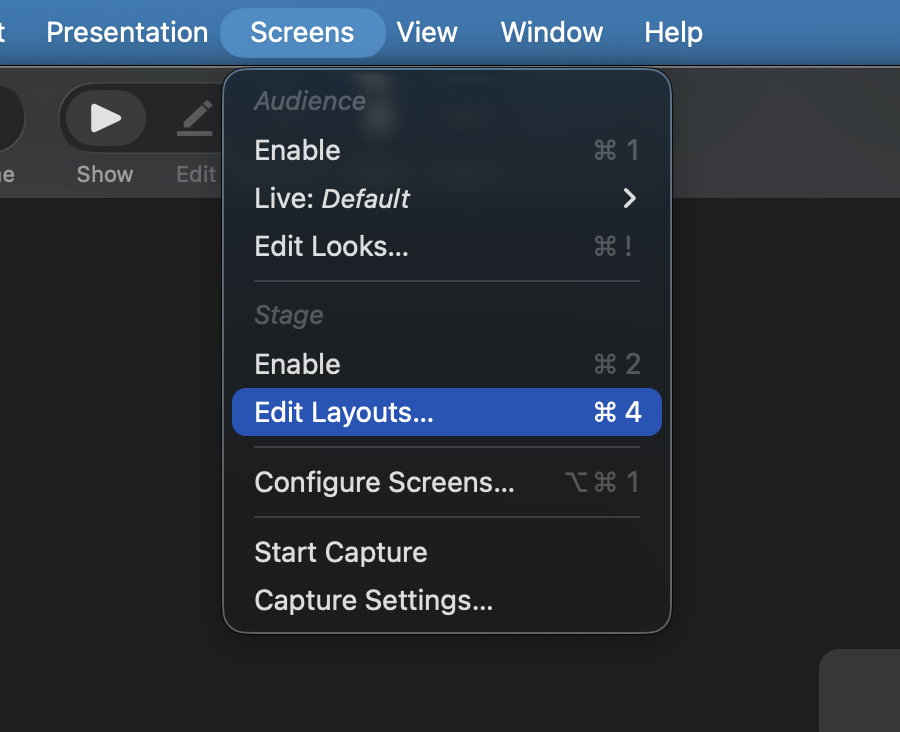
Open the Screens → Edit Layouts… menu.
Screens → Edit Layouts… (under the Stage heading).
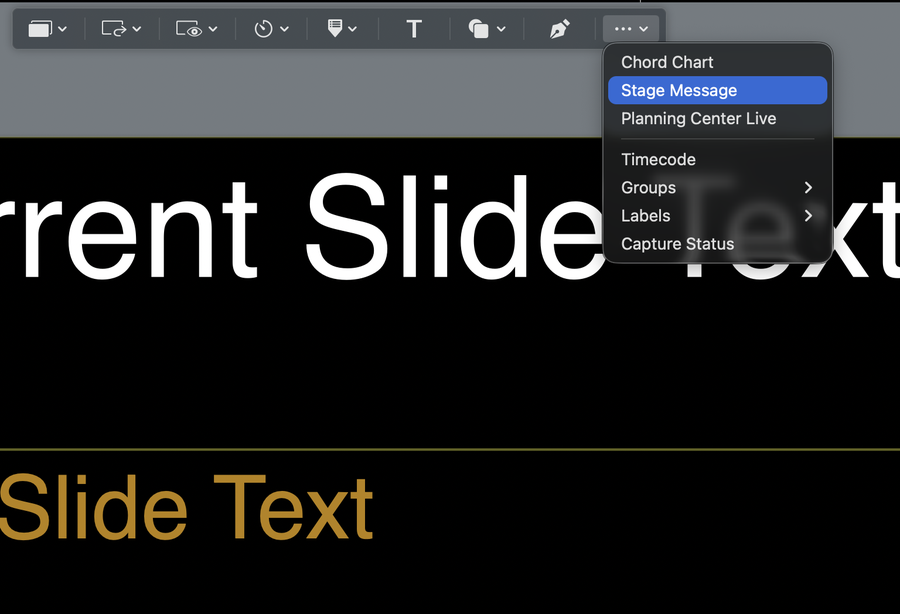
In the layout editor: click the … button (more elements) and choose Stage Message. Position and
size the element on the stage screen. Without this element, no text shows there.
… → Stage Message adds the text field to the speaker screen.
In the desktop program: check Send captions to ProPresenter with the host/port from Method 2.
If the audience uses the web overlay (Method 1), set Send to: Stage only.
7. OBS – captions in your livestream
The web app publishes the captions automatically – in the desktop program, check Publish captions online. Use your
Caption link from the portal as the URL — the same web page as the ProPresenter overlay in Method 1.
(Local alternative in the desktop program: Caption web overlay, port 8899.)
In OBS: Sources → + → Browser. URL: your Caption link – or http://localhost:8899/ for the local alternative
(OBS on another computer: replace localhost with the Tolka Live computer's IP). Width/height: match your canvas, e.g. 1920×1080.
Done – captions appear lower-center with a soft fade and transparent background.
The same ?text= and styling parameters as in Method 1 work here too.
8. AI voice (spoken translation)
In the web app: check Play the voice here. In the desktop program: ⚙ Settings → Audio → check Speak the translation.
Pick a Voice output: headphones, a separate PA zone, or a virtual audio device
(e.g. BlackHole/VB-Cable) to route the voice into OBS or an interpretation system.
9. Profanity filter & AI instructions
The profanity filter is on by default and masks inappropriate words as ✱✱✱✱ in all captions.
Lists are per language and never censor religious words (heaven, hell, Satan …) or false friends (Swedish slutet).
In the desktop program you can add your own blocked words in ~/.live-translator-blocklist.txt – one word per line.
Instructions to the AI in Settings controls tone and context. The default text suits church services;
rewrite it freely for conferences or other events. The AI is always instructed never to use crude language.
10. Important: the AI can make mistakes
Tolka Live uses advanced AI translation. It is very good – but not perfect.
Individual words, names or numbers can come out wrong, especially with unclear speech, dialects,
unusual expressions, or several people speaking at once. Treat the captions as a
support for the audience, not certified interpretation. Do not rely on Tolka Live as the only
channel for legally, medically or safety-critical content.
Tips for best quality: clear speech into a good microphone, one speaker at a time, and a clean speech signal without music.
11. Troubleshooting
No text appears – Is the status green? Right microphone selected? Did you grant mic access? Speak close to the mic and check signal.
"Invalid license key" – copy the key again from the portal (all of it, including TL-).
"Monthly hours used up" – upgrade your plan or wait for the new month; see usage in the portal.
Web overlay shows nothing – running the desktop program: is Publish captions online (or Caption web overlay) checked in Settings? Does the web object
cover the full slide? Test the URL in a normal browser with ?text=Hello appended.
Web overlay frozen (the app is still translating) – hide and show the Prop again; the page reloads and catches up instantly.
Yellow ProPresenter status – wrong host/port, or Network not enabled in ProPresenter.
Stage shows text but audience doesn't – the Message isn't named exactly Translation, or has no token.
Audience shows text but stage doesn't – the Message element is missing from your stage layout.
A short break every ~10 minutes – normal: the cloud session rotates and the app reconnects automatically (brief yellow status).
Anything else? Email [email protected] – include what the status bar says.
 Tolka Live